
Atlas Stone

The athlete (Nathan Jones) grips a heavy spherical stone, brings it to their lap, and extends that stone to a platform or over a bar.
Atlas stones are one of the most iconic movements in strongman. Learn about how to combine technique, programming, and brute strength to begin your stone loading adventure, or help you chase that monster you have had your eye on.
Table of contents
Warming Up
Setup
Stance
Pick
Lap
Load
Platform vs. Bar
Stone Series
Shouldering
Reps for time
Specs
Brands and Differences
Tacky
With or without tacky
Energy Systems
Accessories
Recovery
History
Atlas stones came in their first form as the the McGlashen Stones during Worlds Strongest Man 1986. The original iteration had the competitors move the stone to a white line, then carry the stone to the barrel before loading the implement. Only the top three competitors were able to complete the series. in 1998 WSM, the modern name of Atlas Stones entered the arena. Atlas stones have continued to evolve. In October of 2015 Mike Bartos introduced the Stone of Steel, which is a metal loadable version, and there are now rubberized atlas stones in the early stages of production by Andrés Guðmundsson in Iceland.
Basic Execution
Warming up
Warming up for stones is difficult since lighter stones get far smaller, and the diameter makes it almost a different lift compared to large ones. Ideally you want to choose the lightest stone with the closest diameter to your working weight to do some lapping and your ramping sets on.
Some mobilizing and light warming up of the primary muscle groups may help get you feeling more comfortable picking up a large round object from the floor like the “Don’t do this” symbol on a Group Lift warning sticker. Common areas to target would be biceps, lats, glutes, quads, and thoracic spine.
Setup
Stone Condition: Always investigate the stone(s) that are going to be loaded. Whether you’re in a contest or practicing stones at the gym, you need to understand the stone you’re going to lift so you can position it correctly. Below are some of the major things to keep an eye out for, and some suggestions for how to deal with them.
Mold Overflow: What is it? - There is often a bulging and likely rough circle on one end of the atlas stone. This is where the concrete was poured into the mold, but has not been repaired or ground off. What to do with it?: - One option is to see the stone can be balanced or braced on top of that bulge, raising it up slightly and giving you an option to get your arms around the stone more. The second option is to have that overflow just barely touching the ground past where your hands will be. That way as you load the stone it wont bite into you.
Fresh Stones: What is it? - Brand new, or very clean stones can be exceptionally smooth, sandy, or rough. What to do with it?: - If its smooth, just brace yourself for difficulty, and use tacky allowed. You may want to have some on the back of your hand for additional reps. If its sandy, you definitely want spare tacky available, and try to find the least dusty or sandy portion for your arms to grip. Finally, if its very rough, unprotected arms will very likely develop stone rash (strongman equivalent of road rash but in slow motion). The pick might be easier but consider getting some sort of arm protection so you can train more frequently.
Uneven tacky: What is it? Some stones are utilized the exact same way every time and develop a thick dried tacky distribution on the bottom. What to do with it? This might tell you that there is an uneven foam insert or lead core, or that it has a unique shape. If the stone is heaviest on the bottom, it will almost alway settle in the same position which makes it easier to pick, but more difficult for extension. At a contest look at every stone in the series and adjust it how you want.
Judges might not love it, but you can stall a few times if it is clear you’re focused and setting up the stones. At most competitions the stones are out and you can examine throughout the day.

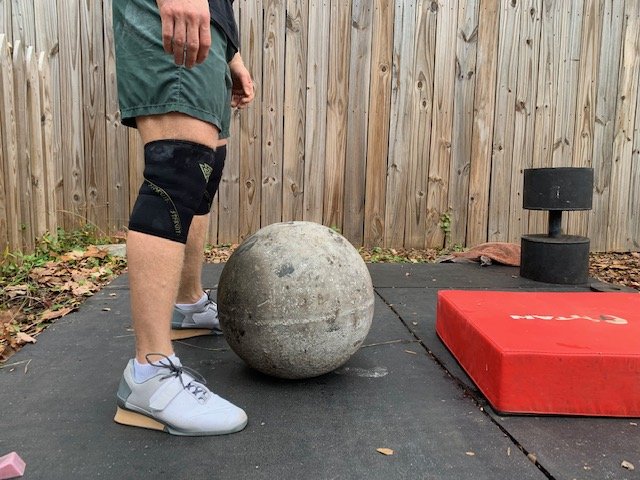
Stance
Stand over the stone with the center of your feet in line with the middle of the stone. You may be slightly behind the midline depending on your mechanics and technique. Really the thing you want to avoid is having it be too far in front of you, away from your midline and therefore your center of gravity.
Photo: Note how the left 2 photos have the stone in line with the center of mass, where the two on the right force the lifter to bend over and lift off-balance.
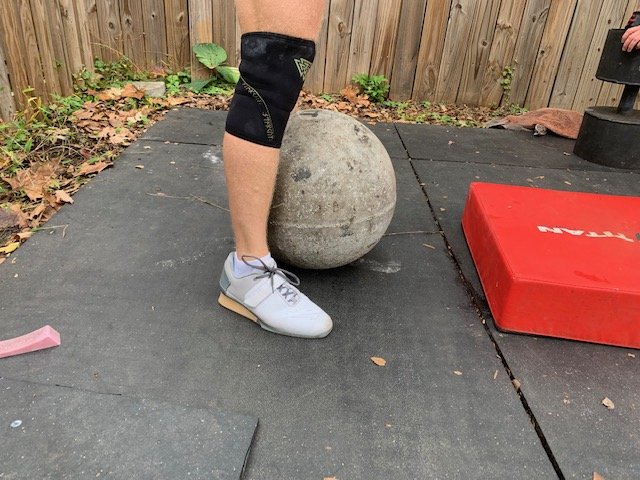
The stone should be as short of a distance from the bar or platform that will allow for your head and hands to clear it on the load. Usually this is the widest part of the stone being about a foot or two away from the platform or bar.
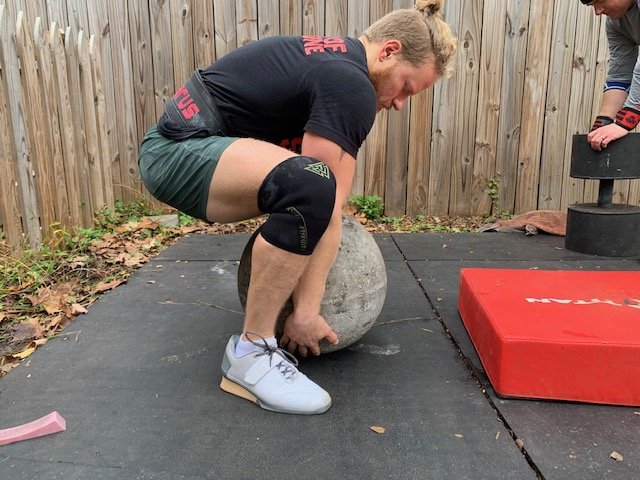
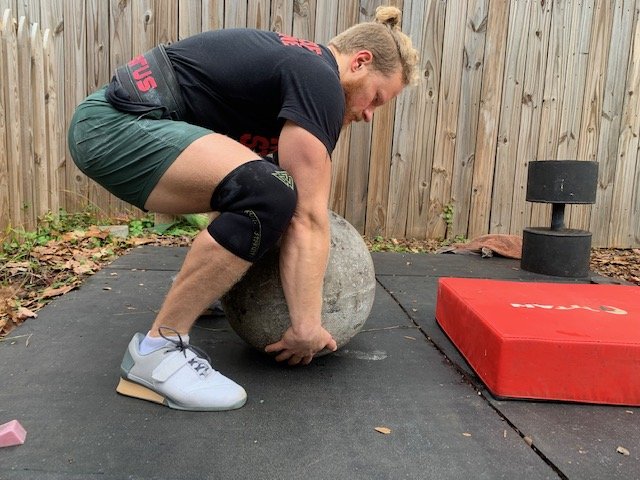
Pick
Squat down and bend over and reach around the stone with palms facing each other. Tip the stone side to side to allow your hands to get as tightly under it as possible, spread your fingers and press your forearms and palms into the stone. The idea here is to maximize surface area in contact with the stone.
Keep your hips relatively high and engage your glutes and hamstrings while bracing your core. Push off the ground with your feet while you lift the stone directly upward. As the stone passes your knees, you can roll it into your lap position allowing you to sit back and generate power in your hips.
Lap
Now that the stone is lapped, if your stance was particularly wide, use this opportunity to work your feet closer together and more underneath the stone. This will raise it higher off of the ground, and higher up on your chest.
Double check your proximity to the bar or platform that you will load to and adjust as necessary from this position.


Load
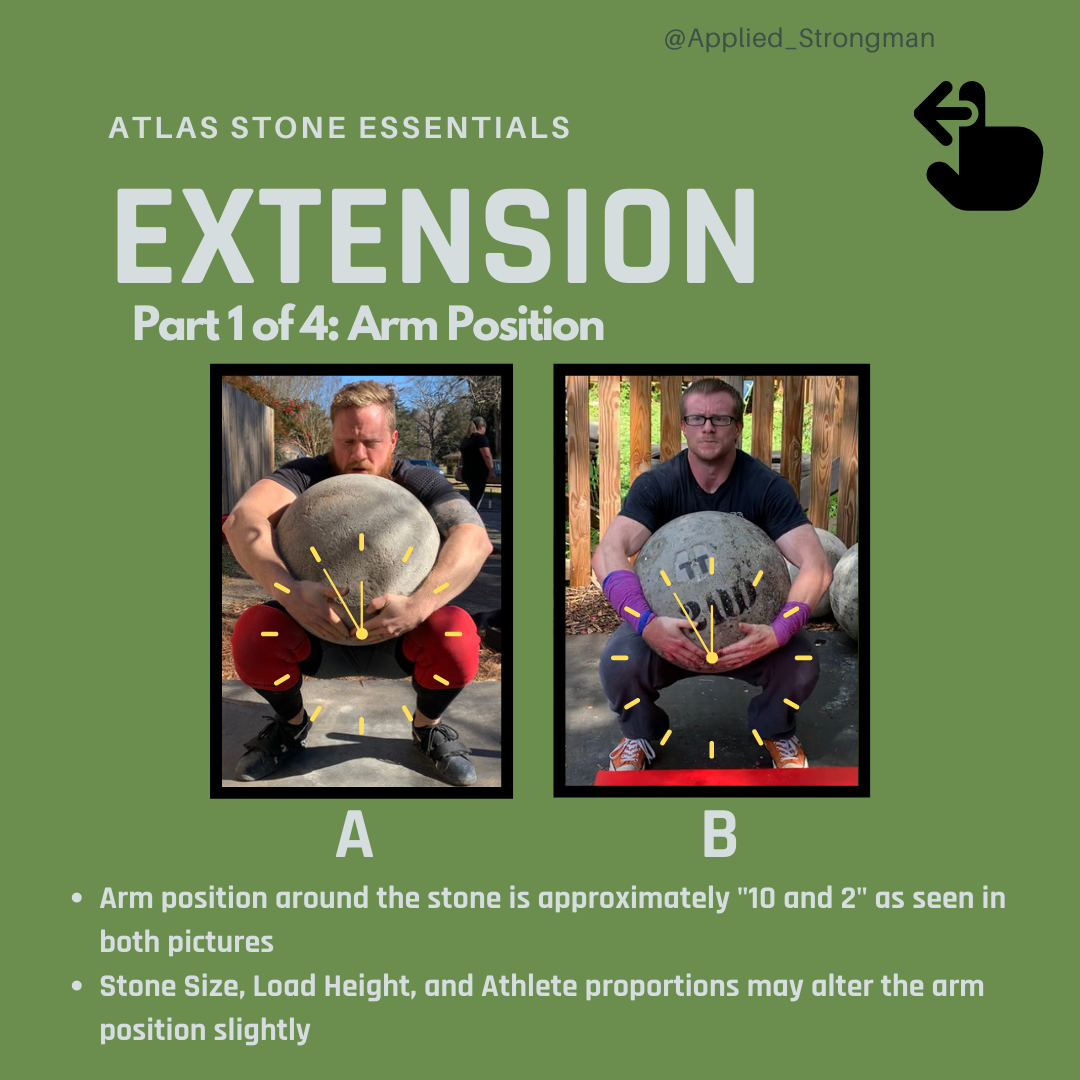
Your arms should be across the stone at approximately the 10 and 2 position on a clock. If the stone is particularly wide and/or you have plenty of tacky, experiment with gripping the stone all the way toward the positions of 9 and 3. Keep your elbows pointing away from the stone, never down or “underhand”. Ideally your hand position should be in a neutral or somewhat pronated position on the stone. This may reduce the load on the bicep brachii and allow the brachioradialis to contribute more to maintaining and positioning the load.
Grip the stone with a “pec fly” or “bear hug” style while keeping it as tight to your upper chest as possible. Once the stone feels as secure as possible, explode upward pushing off with your legs and keeping your trunk braced.

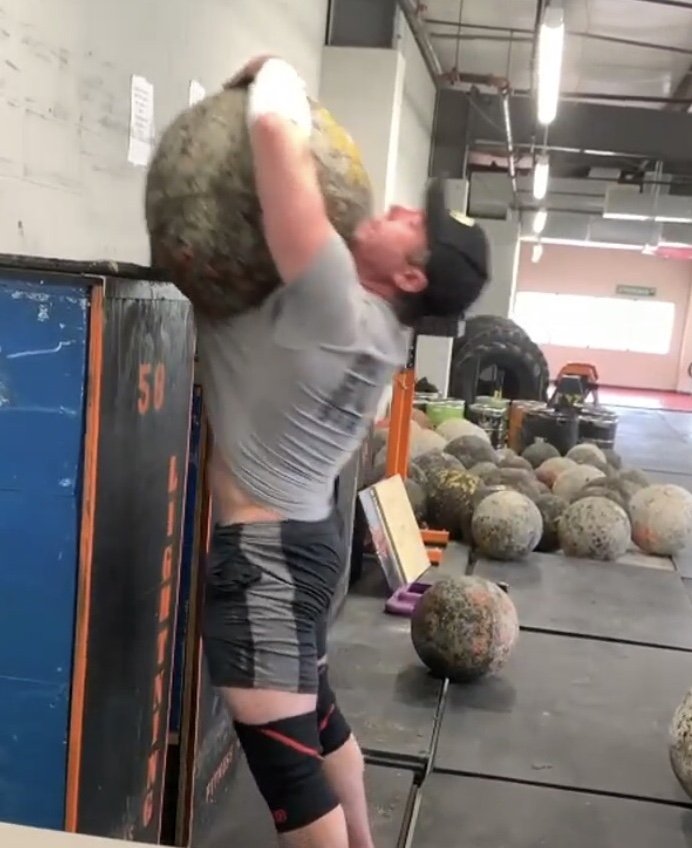
As the stone gets higher in front of you, you should be extending at the chest, hips, knees, and ankles as seen in the photo. As soon as the stone passes the top of the edge, you release your grip and push your chest out to get it over. Make sure you keep leaning on it until it is completely over the threshold, or it will come rolling back which is a problem that is very difficult to fix.

Mistakes
1. Cradling. This hand position (pronated) should be avoided fully.
2. loading from a wide stance. The wider the stance, the lower you will be for the load.
3. low chest position. A low chest position eliminates any thoracic extension while also reducing the height of the stone at full extension.
4. Being too close or too far from the platform or loading bar might cause you to bump it on the way up, or have to walk or lean forward.

Event Variation and Technical Alterations
Platform Vs. Bar
A platform is a more stable and therefore more forgiving surface than a bar, if you need to lean against the stone to push it over. See how the athlete below is able to load a stone to a high platform by transitioning his arms and bodyweight from a “load” motion to a “push” motion. This is not possible over most bars as they will rock with horizontal force and sap your momentum.

“Over bar” usually means you are loading over a yoke crossbar. The main difference is you can’t lean into it as the yoke will move. The other is that this type of load is sometimes based on reps in a given time, meaning someone will be rolling the stones back to you from a crash pad or tire.
A word to the wise: Remember a volunteer will be risking their well-being to receive your stone and return it to you, so you want to be aware of how you load the stone. Fight the temptation to be that person who throws the stone over the bar. This is not a sign of dominance, it is a sign of stupidity as you not only have created a dangerous situation for the person returning the stone but you have now made it harder for them to do that job. Even if you are able to launch it, make sure to load the stone just over the bar and allow it to fall straight down making for a quick, easy, and safe return so you can attack another rep. Some competitions (rightfully) even threaten disqualification for reckless throwing of implements. You will want to train like this as well, naturally.
Stone series
This quintessential variation of atlas stones involves loading several stones for time, usually ascending in size, and sometimes descending in platform height. There are 2 main things to think about when you are training for these.
Make sure you are training to complete at least the number of stones that will be in the series. For example don’t show up to the competition never having loaded 4 stones in a row if that is the event. If you don’t have many stones, sets of 4 will do.
Practice transitioning between stones, and getting to your placement and grip right quickly. Remember that you will be getting more fatigued with every stone, so don’t take for granted that you can lift the top stone in training for a 1 rep without making sure you can do so after several other loads.
Shouldering
Setup, pick, and lap are going to be unchanged for shouldering stones.
Once you have a good lap position, begin your motion as if you were going to load the stone, but concentrate on keeping the stone motion upward and towards you. A backwards lean and even a slight dip of your hips will give the stone a more horizontal path to roll on. The roll is key, as it takes a substantially lower amount of energy to lift an object vertically than it does to roll one.
Keep your glutes tight and core braced to allow a strong base to receive the stone. This often-ignored detail is just as important as your aboility to get the stone up to your shoulder.
Gear considerations: a grip shirt with sleeves will protect your shoulder, elevated heel shoes may also help with your stability and power out of the lap position, and give you a better base to receive the stone.
Programming: Work with lighter weight stones to achieve speed and rhythm before moving up to competition weight.
Reps for time
If you are doing a reps-for-time event, you want to be sure to be as efficient as possible. In training you will want to practice reps for time with both light and near-comp-weight stones to get a feel for what goes wrong when using the latter.
Last man standing
This event involves athletes loading the stone in a head-to-head fashion, often as a tie-breaker. One athlete will load the stone, and the other will have a set amount of time to load it, until one of them is unable to complete the lift in the time allotted. If you know this type of event is coming, we suggest training with AMRAPs as well as EMOMs, or Every 30 Second sets for example if you know the time allotted will be 30 seconds.
Equipment
Specs
Stones coming in all sizes so it is futile to try and categorize them. Fabricators use light/heavy cement mixes, and insert foam balls or lead to change the weight of stones at different sizes. Just be aware that the stone you use at the competition might be different than one you have used in training (and it is not uncommon to end up being a different weight entirely anyway).
Brands and differences
Molds
Hybrid Molds are primarily available through Rogue. These molds come in 13 sizes from 10” (25cm) to 19” (48cm). and range from 35lbs (16kg) to 300lbs (136kg) molds.
$150 for a 18” (46cm) stone mold.
Slater Molds are the OG stone molds. These molds range from 8” (20cm) to a mind mindbogglingly large 24” (61cm) stone.
$119 for an 18” (46cm) stone mold.
Hybrid has more diameter increments than Slater, allowing you to choose the weights you want without the use of light or heavy material additions to the concrete. For roughly equivalent stone diameters, Slater stones are a little bit cheaper. In all honesty both brands are fantastic and you cant go wrong. Choosing will be mostly a choice between slightly higher price for convenience (Hybrid) or slightly lower price and a little bit more work (Slater).
Rubber
50lbs 10” diameter, 75lbs 12” diameter, 100lbs 14” diameter, 150lbs 16” diameter, 200lbs 18” diameter options.
Feels just like lifting a regular stone in terms of balance, weight, and looks. The rubber wrap is surprisingly “slick” due to the type of rubber. Without a tacky towel or spray 200lbs feels far more difficult to pick than a 200lbs stone. The build quality is absolutely top notch.
Icelandic Super Stones - Andrés Guðmundsson
The textured rubber style of these stones lends itself to an excellent grip. The layer of rubber seems quite thick and absorbs a lot of energy on the land. This is great for your floor, feet, fingers etc for impacts, but maybe a bit less fun for the athlete spotting your stone after a high load. These have a pretty decent bounce to them but even with that are absolutely great. See Lynn’s review below for more thorough review and comparison (Link Here)
Metal
MB Powercenter “Stone of Steel” $999.00
20" (51cm) 135lbs (661kg) Empty.
This is a high quality durable construction “stone”. with a hefty $999.00 price tag, you’ll probably want to always use this with a good set of crash pads, foam mats, tires, etc to ensure it lasts forever. Textured/powder coated steel spheres add a good texture for tackyless grip though a tacky towel or spray tacky does help. Spaces help you distribute the load evenly within the stone so that it is approximately uniform. Some small drawbacks are that the spacers are relatively easy to lose, re-lining up the spheres can be somewhat of a chore, and loading/unloading can take some time out of your session. Over all the product is absolutely fantastic if its within your budget. MB Powercenter has a high level of professionalism and customer care as well.
One additional note is that the paint chips off over time. It’s likely unavoidable but some stones have lost a majority or all of their paint. This may have been addressed or fixed in newer models as the one I’ve trained with was an early model. I don’t consider this a defect in manufacturing, simply the nature of training with painted steel.
Titan Loadable Stone $749.00
Functionally the design is basically the same as the MB Powercenter, and the lower price tag makes it more accessible. We have not been able to train with this specific implement yet, but suspect the drawbacks are somewhat similar, with the caveat that there is likely somewhat more care needed to keep the implement in good shape when loading/dropping. We will double down on the suggestion to have adequate crash pads, tires, foam pads, etc.
DIY guide
Homemade molds
Beach Balls/Large inflatable balls
Alternatives
Pins/collars a loading pin like this can be loaded up with 45lbs plates, laid on its side, and gripped as if it were an atlas stone. This is one of the best approximations for atlas stones that are available at commercial gyms. its possible to combine this method with a pulley to practice loading. A video demonstration of this will come later.
Tacky/Grip enhancers
Tacky
Tacky is a sticky substance used to somewhat adhere the hands and forearms to the stone, enhancing grip for picks and for loads.
A survey of 37 strongman (male and female) competitors saw that 41% of competitors trained using tacky only on heavy stones, 22% used occasionally on their stone sessions, and 16% used tacky only at contests. The remaining used tacky at other intervals/times.
Primary reasons for using tacky (in order of most impactful):
#1 - Grip. most athletes liked the increase in grip to be able to reliably load HEAVIER stones for contests, training, overload, etc. Improved grip was also good for those who wanted to train with more volume at moderately high loads. Finally, many athletes prefer tacky simply to not have to focus as much mental energy on the grip itself.
#2 - Safety. Many athletes feel that tacky is protective against bicep strain and injury. Whether this is from better grip on heavier stones, or by reducing total volume strain while training.
#3 - Competition. Lastly, tacky is often allowed in contests. Training within contest conditions is an important factor for specificity and contest prep.
Brands: (Survey also scored Brand Grip on a scale of 1 to 7. 1 meaning no grip whatsoever, and 7 being absolutely perfect)
Many athletes use multiple brands so the percentages here my look wonky.
87.9% of athletes use Spider Tack
Scored Highest on our grip scale. Spider massively beat out other brands in the “Near Perfect” or “Perfect” grip category by responders. being the only brand to receive the perfect score by more than 1 person. (73% of responders gave it a “Perfect” or “Near Perfect” grip score). Spider Tack also boasts the ONLY brand to earn zero votes below 4 on our scale.
24.2% of athletes use Elite Tacky
Results landed Elite Tacky within the “Great” to “Near Perfect” categories. (70% of responders gave it a “Great” to “Near Perfect” grip score)
21.2% of athletes use Bat-Tak (Unsure of current availability)
While being an underdog in terms of exposure, it performed about equally with Elite in terms of grip score. (79% of responders giving it a “Great” or “Near Perfect” grip score).
Killer Tacky - Didn’t have enough scores for ranking.
This brand did not have enough reviews to be fairly scored at the time of the survey.
Shopping for tacky
You need to understand your climate and the climate of your competition when choosing tacky. one of the main concerns for tacky users is the “stickyness” when the tacky is too hot or too cold.
Spider tacky and Killer Tack (by Colossus Wear(R)) seem to be the two brands that offer variable climate options.
Responders most cared about temp/climate for shopping. everything else was in about the same after that.
Price, reputation among athletes, ease of removal, how well it spreads, country availability.
Tacky Removal:
It is ideal to have an abrasive in combination with a mineral spirit or oil based solvent. Goo Gone, Baby Oil, WD40 all work particularly well. Coarse rags or paper towels with the solvent make a great way to scrub and remove tacky. Once you’ve removed the tacky, water and soap will remove the last of the residue and the remaining solvent. Ideally you’ll remove tacky outside, then move final clean up to the bathroom/hand washing station.
Note: No product we know of has been approved for use on skin, so please try all of these recommendations at your own risk.
Tacky Towel
Tacky towels are a grip aid that provides a light amount of stickyness to help grip the implement. Generally the residue fades after a few reps or sets and doesn’t require any specific clean up. The implement also retains little to no residue after training either, making it a great option for daily training when tacky isn’t an option.
Tacky spray
Similar to the tacky towel. This product is slightly sticker and retains a small amount of residue on the athlete and implement that may require small amounts of clean up.
Chalk
if you train alone, use chalk as you like. If you train stones in a group or at a gym, talk to your team. Chalk can interfere to some degree with tacky users, and interrupt their training. Some gyms/groups can get quite upset when people get chalk on their stones. Chalk provides a light grip on clean stones, especially if you are prone to sweatiness, or can provide a small barrier between your arms and tacky covered stones helping you get away clean.
Programming Considerations
Training with or without tacky
Due to the substantial differences between stone lifting with and without tacky, there are some inherent questions about training.
Should I train with tacky if I am not competing? - It is really up to you. If you want to lift bigger, heavier stones ultimately, then you probably want to use it. If you do not, and just enjoy getting better at lifting and shouldering smaller stones, then keep your arms clean.
Should I train with tacky if it is not allowed in my upcoming competition? - In general, no, because you will be in for a rude awakening on comp day. The situation where it might be warranted is if you are newer to stones, or you are having trouble even lifting the competition-weight stone. You still want to incorporate tacky-less lifts, but it would be nice to be able to feel what it is like to lift and load the competition stone.
Should I train with tacky if the upcoming competition allows it? - In general, yes. It is also probably good to do some tacky-less sessions, as it will help you work on your “hugging” strength a little more, and force you to get lower to the ground, so when you have tacky it feels much easier.
Energy Systems
Phosphagen - Will be used for very heavy and max stone lifts. Nothing to do to prime this system other than rest enough between sets.
Glycolytic - The primary system used in stone lifting more than 1-2 reps. Make sure you have decent carbohydrate availability from a pre-workout snack or a generally moderate-high carbohydrate diet.
Aerobic - 1 minute max reps events will require more aerobic conditioning than max weight events. To train this system, simply add timed sets to your program. Loading lighter weight stones allows you to train the conditioning aspect without overtraining the event.
Skill Level
Medium to High - When initially learning the stone load, you want to dedicate more time to getting it “right” than some other lifts. This might mean more practice reps and less working sets, videoing and analyzing more reps, or including the lift more frequently in your training.
Accessory exercises
Rows - Any type of rowing exercise will help you build the ability to squeeze and pull the stone in on a pick.
Classic barbell will work, but plate rows are a solid variation, or even implement rows like with a sandbag or block.
Pendlay style probably transfers better. This is where you allow the bar or implement to hit the ground for a pause before your next rep, simulating lifting a stone from a dead stop.
Front squats - These mimic loading exercises by putting the weight in front of your center of gravity, and require back extensors to keep you from bending forward and dumping the weight.
Pauses - Paused reps can simulate coming out of a lapped stone position.
Zercher squats - These will have a similar effect to front squats, forcing you to actively stay upright against a load, while applying force with your lower body. They have the added benefit of transferring the load in front of your center of gravity, which is much more similar to a stone load than a front squat. Additionally, we have seen these benefit client’s hip and ankle mobility, especially if you make a point to sit as deep as comfortable on each rep.
Chest flys - These might allow you to get a greater squeeze on the stone. This effect is not going to be as strong as others, but might help especially if you are a novice who may not have sufficient baseline pec strength.
Recovery
Musculature
Glutes, hamstrings, quads, spine erectors, and biceps are all used significantly in the atlas stone event. It is best to allow at least 1 full recovery day after heavy stone sessions, and if they are your focus during a block, at least 1 rest day before as well.
Connective tissues
The Biceps tendon is at significant risk during this event. Some things you can do to protect it would be:
Slowly build your stone reps and weight through a block, whether you are new or coming back to training stones after some time away.
Use tacky or other grip aides, especially if the stones are slippery. Biceps injuries often happen when the stone begins to slip.
Keep your arms straight when you pick the stone, like in a deadlift. Make sure your arms never become “underhand” from the pick to the load.
Warm up your arms and biceps prior to stone lifting.
Skin
Stone kisses/stone rash come from friction and slipping during stone picking and loading. As you get better at loading stones, this may be less of an issue unless you are frequently going for new maxes. To avoid it, you can try wearing stone sleeves, or wrap your forearms in Vet tape, or duct tape (prior to tacky application).